 |
|
 10-26-2011, 01:46 PM
|
#1 |
|
Tri-State Aficionado
|
280z that replaced the TT
The run down: 1976 280z Its silver on blue and black interior. I got the toyota 4x4 calipers with the 84 z31 rotors. Worst thing is it sat for 10 years, all im planning on doing is: 1) Clean the HELL out of it. (did that) 2) Replace ALL the hoses on everything. (replaced a few most seem to be amazing, inside and out. I have some on the side just in case, they are easy to get too. The ones that arent I will replace.) 3) Drain EVERY FLUID on the car. The motor oil is 10 years old and BLACKER THAN BLACK. There was some brake fluid in the MC but not much and it was shot. (drained and replaced the Clutch master and slave cylinder. Soon replacing the Master cylinder with the 15/16 280zx one.) 4) After draining all the fluid, add the 4 piston toyota calipers and the z31 na rotors to the front, and find a rear disk set up. (im thinking the maxima set up, any advise would be cool. Im thinking about doing it AFTER I get the z running. The fronts still need the spacers, adaptors and brake pads. The rears need the rear conversion kit and the 240sx calipers.) 5) after the brake set up bleed everything (I plan on doing it more than once to clean it out good), brakes and bench bleed the clutch. (Already bled the clutch and feels so much stronger) 6)Paint the roll cage black (I dont like the rusted look LOL) Its SCCA appproved soo its a wicked roll cage the welds are orgasmic haha! (Cut the knee bar because that was a pain literally. Thinking about painting it a midnight blue now, considering I cant powder coat it.) 7) Replace battery, seeing if the tail lights work well, and probably getting better headlights. 8) Get an exhasut since its running right from the exhaust manifold! (My exhaust manifold is said to be better than the headers they offer, but might get headers because they are new and lighter. Not looking to spend if I wont gain anything though.) 9) Tires for the panasports, and better lug nuts. 205/15 fronts, 225/15 rears 10) MSA front bumper with the 240z turn signals, MSA carbon fiber spoiler, and ZG flares. 11) MAYBE a radio, the car has almost no luxuries, so not sure if I want to even put in a better radio or anything. (zune works well for me, and it has a cassette player) 12) Fix the window, it some how feel off track. (Fixed, but I need key for the locks of the car.) 13) DRIVE THE PHUCK OUT OF IT! (most likely will be in the spring) What the guy said: 76 280z California rust free car(Coupe) it has full coil over suspension and 4 wheel camber plates to adjust the suspension. (IT IS SLAMMED TO THE FING FLOOR) v It sits lower than a 240Z and should handle like a slot car . Toyota 4 piston calipers and rotors for the front brake upgrade and 15 inch Pannasports. Its silver with black interior and has a full roll cage and comes with Vintage SCCA log books if you ever wanted to go racing its vintage eligible. (Tried researching for "Becks ultra high performance or anything like that but came up empty. I would love to speak with the owner.) It Was an ITS car (improved Touring ) so it still has all of its street equipment and was never cut up or gutted or wrecked just the carpet was removed, has about 3 little dents but nothing major. The full dash wipers lights door panels everything is all there. 2 brand new racing seats It still has its original L28 motor that was rebuilt to stock specs and still has its original fuel injection & 4sp manual transmission . Pics when I first go it:     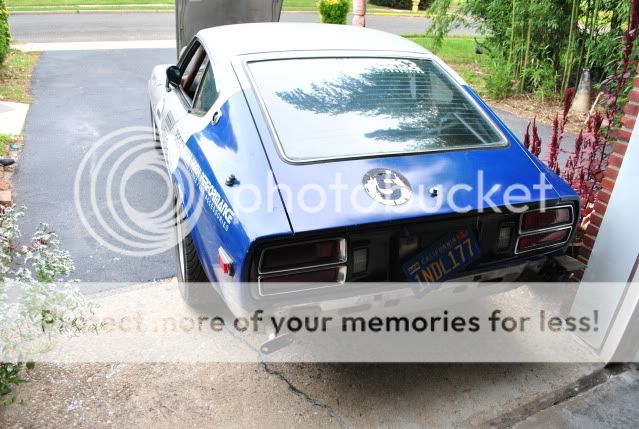  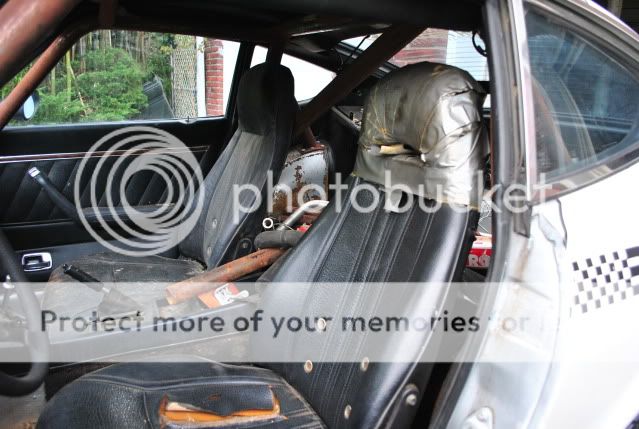      Now some progress that has been done: Took the disgusting bumper shock absorbers off. Did a bit of cleaning and dropped the intake+exhaust manifold, gas tank, and tranny. Looking to pull the motor to make life easier. Still havent ordered anything, but this is how she sits right now:       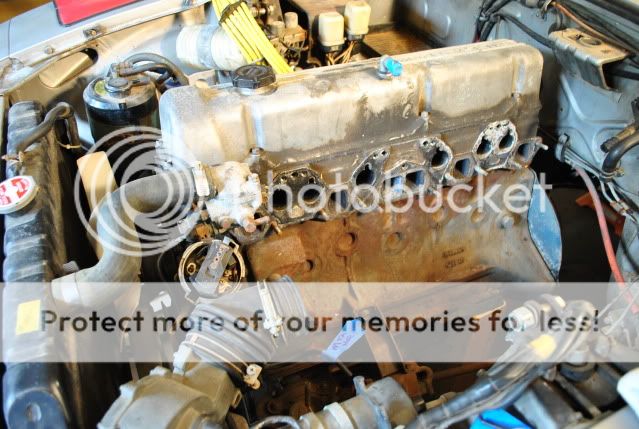  ^ Got some cleaning to do.   ^Looks can be deceiving! This little bugger weighs alot more than I thought! I would say upwards of 25lbs.    ^ SO light, its very nice and well built.  ^Brought another 76 gas tank, which are RARE, but turns out it had a pin hole leak. Decided what the hell, and will restore my tank instead since it it nicer.  ^ I think the "withdrawl lever", the metal spring type thing might be bent out of shape.  ^ Clutch looks to be in place lol.   ^ The only rust spots on the z. One of which is from scrapping the pavement, the other is a common area. In which the drain gets clogged, both are easy to fix and not serious. 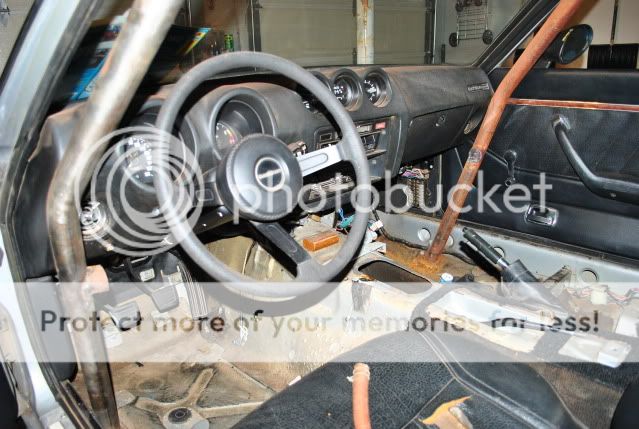 ^ Took out the stupid knee bar, looks much better. The roll cage is SO tight ti the body, that the driver side rood liner is melted from the rubbing friction against the cage.    Thats all for now! Thanks
__________________
Be sure to visit our page and join our group on Facebook! New Jersey Z Car Club: NJZCC 76' Datsun 280z Build Thread: To view links or images in signatures your post count must be 10 or greater. You currently have 0 signatures. |

|

|
|
10-26-2011, 03:17 PM
|
#3 |
|
TST Ruined My Life!
 |
Awesome, one of my all time favorite cars. Please keep updating the journal!
__________________
1997 Eagle Talon Tsi To view links or images in signatures your post count must be 10 or greater. You currently have 0 signatures. Updated weekly with Dyno, Track, AutoX, Street, and Event videos. Big updates coming soon! To view links or images in signatures your post count must be 10 or greater. You currently have 0 signatures. |
|
|
|
|
10-26-2011, 03:37 PM
|
#4 |
|
Tri-State Aficionado
|
^ No problem! I will update when I can. I have all the time in the world, its waiting for parts to come in that sucks! lol. Have to wait until friday to send the gas tank to be professionally restored, which then will probably take another two weeks to finish.
__________________
Be sure to visit our page and join our group on Facebook! New Jersey Z Car Club: NJZCC 76' Datsun 280z Build Thread: To view links or images in signatures your post count must be 10 or greater. You currently have 0 signatures. |
|
|
|
|
10-26-2011, 06:59 PM
|
#5 |
|
Tri-State Post Whore
|
Awesome good luck man. Are you going to be at the Nissan meet ? I don't know if you saw the 71 datsun that showed up last time but he will be there again with maybe one more. You could probably ask those old timers alot of questions if need be lol. The one guy is the original owner.
Those engines are excellent you will have alot of fun. Where did you get the car from ?
__________________
To view links or images in signatures your post count must be 10 or greater. You currently have 0 signatures. 5th annual Northeast Nissan Summer Meet |
|
|
|
|
10-26-2011, 07:25 PM
|
#6 |
|
Tri-State Aficionado
|
Yea im going to the nissan meet again. That day everyone basically left after 2pm because it was so hot, so I missed him lol. But I will be there this year, and hopefully get to meet him. I ask alot of questions, but it is a fun car to work on so simplistic.
The car is an original california car but I brought it in paterson. It wasnt for sale but I asked him if he would and he agreed haha.
__________________
Be sure to visit our page and join our group on Facebook! New Jersey Z Car Club: NJZCC 76' Datsun 280z Build Thread: To view links or images in signatures your post count must be 10 or greater. You currently have 0 signatures. |
|
|
|
|
10-26-2011, 08:01 PM
|
#7 | ||
|
Tri-State Post Whore
Join Date: May 2007
Location: Levittown,Pa
Member #4895
My Ride: 2014 WRB BRZ, 1992 SVX iTrader: (5)
|
I always wanted an old Datsun. Can't wait to see where this goes.
__________________
*formerly TekuDrifter18* Quote:
Quote:
|
||
|
|
|
|
10-27-2011, 08:47 PM
|
#9 |
|
Tri-State Aficionado
|
Thanks! Yea I got pretty lucky with almost no serious rust.
Today I brought a F1 stage 1 clutch kit with a flywheel and a poly urethane master bushing kit.
__________________
Be sure to visit our page and join our group on Facebook! New Jersey Z Car Club: NJZCC 76' Datsun 280z Build Thread: To view links or images in signatures your post count must be 10 or greater. You currently have 0 signatures. |
|
|
|
|
10-31-2011, 11:40 AM
|
#10 |
|
Tri-State Aficionado
|
Well Just brought a performance high ignition coil, engine gasket kit, oil pan gasket, exhaust flange, and a new 79-81 280zx brake master cylinder. Waiting for my clutch kit, bushings and gas tank to arrive. Pretty much just a waiting game. All I need now is a replacement radiator, fuel injector clips (I need all of those for all the wire connectors), vacuum hoses, and fuel line hoses. Getting an engine hoist this week, pulling the motor and putting it together.
Any ideas on what to do to clean the engine bay? Its pretty clean but it is chipping its paint and I want to coat it. Any advise on some cheap primer to fix up the bay and some undercoating for the chasis?
__________________
Be sure to visit our page and join our group on Facebook! New Jersey Z Car Club: NJZCC 76' Datsun 280z Build Thread: To view links or images in signatures your post count must be 10 or greater. You currently have 0 signatures. |
|
|
|
|
11-05-2011, 07:26 PM
|
#11 |
|
Tri-State Aficionado
|
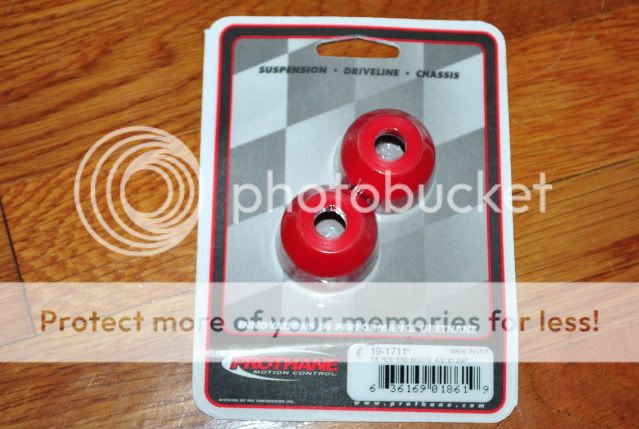
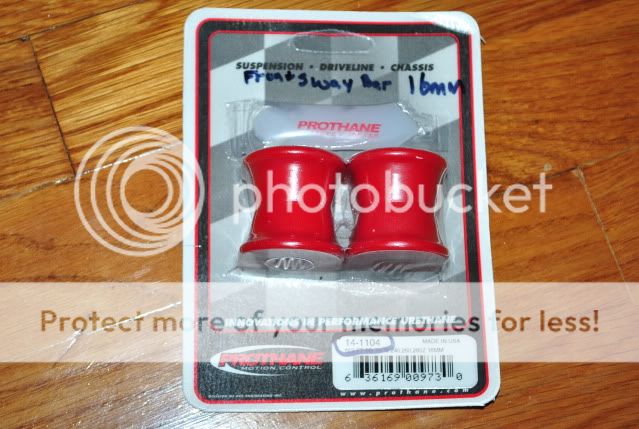
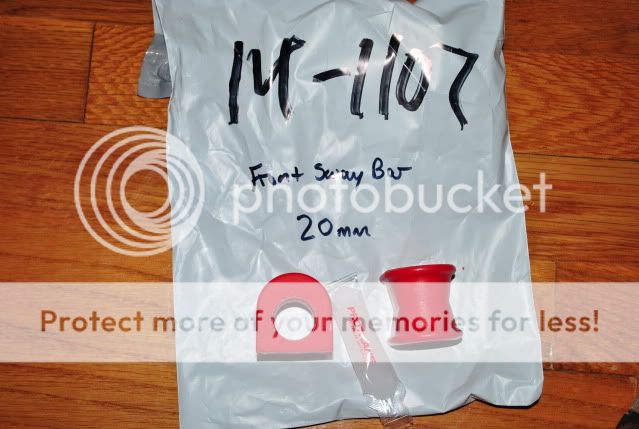
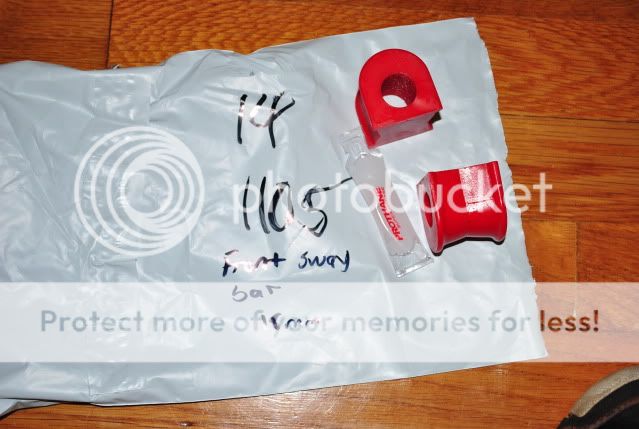
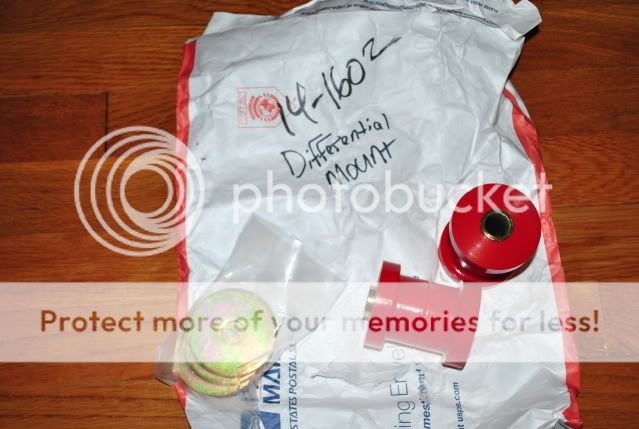
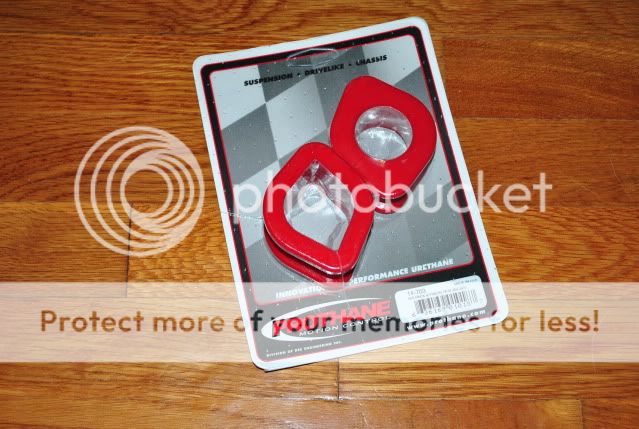
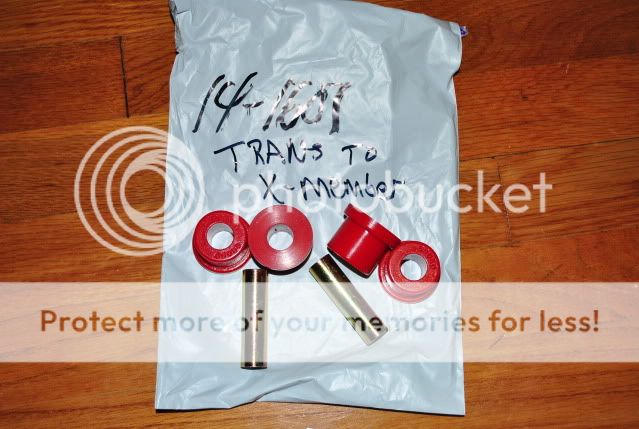
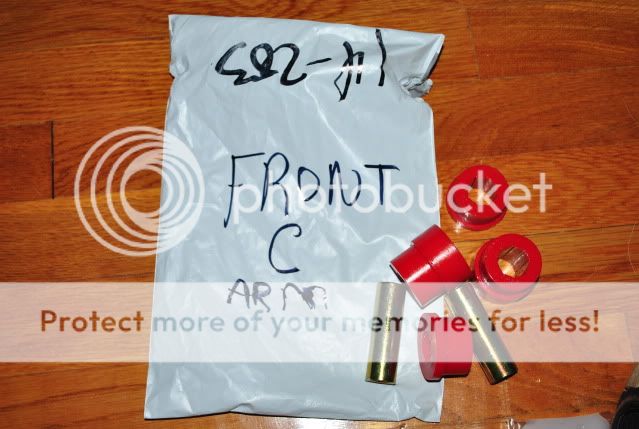
Got my Poly Urethane bushings. Only installed the transmission mount bushings so far. I think they are super bad ass! But I know they will squeak like hell, soon. Here are some pics of the set that I got from ebay. They are awesome and the shipping was ridiculously fast.
               Got the stage 1 clutch and oem flywheel in, along with the gaskets and ignition coil. Still missing the 280zx brake master cylinder, which should come next week.        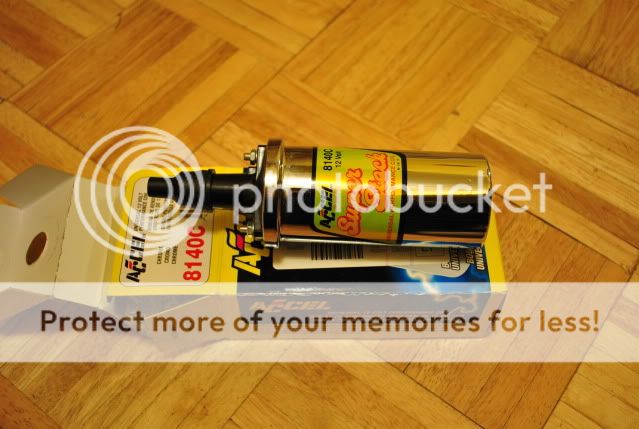 Today Me and my father pulled the motor, it wasnt soo bad, but putting it back in fully dressed with the tranny will not be easy. We have to drop the car roll it out, then roll it in and rejack it....sigh*. Cleaned up the block since it was out, and now its pretty clean. All I need are a few fuel line hoses, vaccum lines, radiator plug and it should be good to go. Still need a battery but its coming along.         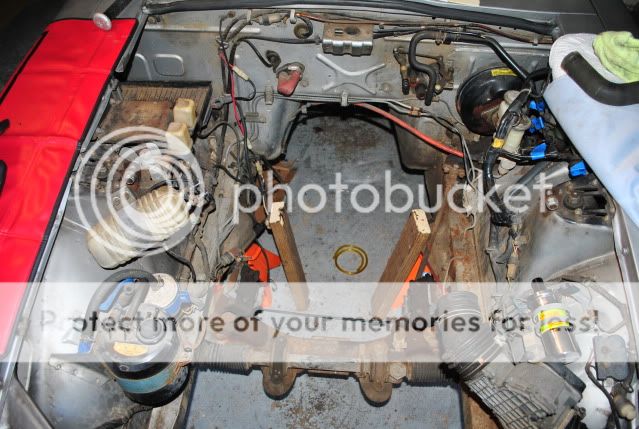 Im not going to paint my block, currently im concerned for my engine bay and the undercoating issue. Any suggestions? I saw the duplicolor undercoating and after a few months it will wear out, unless you do several coats. Im not looking to spend a fortune but I would like to have it prepared for the day I do the full on restoration. (which might be a few years down the line) I have been reading up on, 3M, wurth and a few other cans. I am liking 3M because its around $10 a can as opposed to $20 or the duplicolor at $3. The engine bay really just the frame rails are starting to chip away paint and I just want to stop it before it rusts.
__________________
Be sure to visit our page and join our group on Facebook! New Jersey Z Car Club: NJZCC 76' Datsun 280z Build Thread: To view links or images in signatures your post count must be 10 or greater. You currently have 0 signatures. |
|
|
|
|
11-05-2011, 08:43 PM
|
#12 |
|
Tri-State Post Whore
Join Date: Apr 2007
Location: Montgomeryville, PA
Member #4286
My Ride: old BMW & obnoxious bike(s) iTrader: (5)
|
so awesome, my next project will 100% an early Z. keep us all updated!
__________________
// To view links or images in signatures your post count must be 10 or greater. You currently have 0 signatures. |
|
|
|
|
11-30-2011, 05:37 PM
|
#13 |
|
Tri-State Aficionado
|
^ Nice! Make sure its rust free! Most arent but some have very minimal rust and that is always a plus.
Update: Well its been awhile but with the motor out I have decided what I wanted to do and that was to paint the bay semi flat black. I used probably 4 cans and it came out pretty dam well. Of course being a rattle can paint job it doesnt have the same quality compared to professionally painted. I just sanded down the rusty spots in the bay and painted it. The tough cookie was getting into those hard to reach area's like where the master cylinder is and the clutch master clyinder is. I did the best I could and came out pretty well, I do have some drips but I will fix that later on by sanding it and painting it again. I did use a primer that eliminates rust, so lets see how true that is lol. While painting I went out and brought undercoating. I used 3M underseal as well as rubberized undercoating and for the price ~$10 per can they are well worth it. I basically spayed on the well known area's to rust and some time when the car runs I will under coat the undercarriage. I undercoated my gas tank and it practically looks brand new! I have since worked on the intake manifold and replaced all the hoses. (that was a b!tch but I got them all replaced), then I brought a header to eliminate the spacer issue when I bolt it back on. The roll cage received an experimental color, went with red! So I think im going to paint the whole cage red because it is really nice. Meaning down the line I will replace my blue seats for red. The sad part T_____T Well tearing the motor down I come to find that the head was nice but the cylinder walls are some what rusted. So I think im going to buy a master rebuild kit for about $600 and rebuild the motor and just poloish up the block. Being my first time doing any of this it should be fun learning. y goal at this point is remain in budget and just have a nice peppy z. My long term goal is to have a 1jz in the z and keep it at a moderate 400hp, which is more than enough. Im just looking to get the L28 running for a good while and have my fun with it. Progress of the pics:     ^ My rack looks brand new ;)  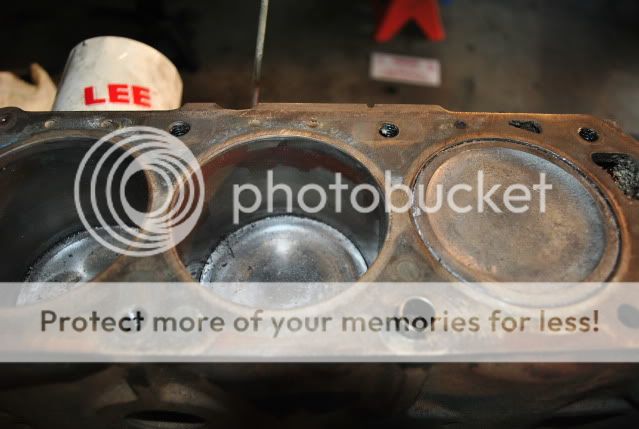    ^I HATE YOU RUST! T_T, ahh well gives me a chance to build something with my own hands, and know it was done right. 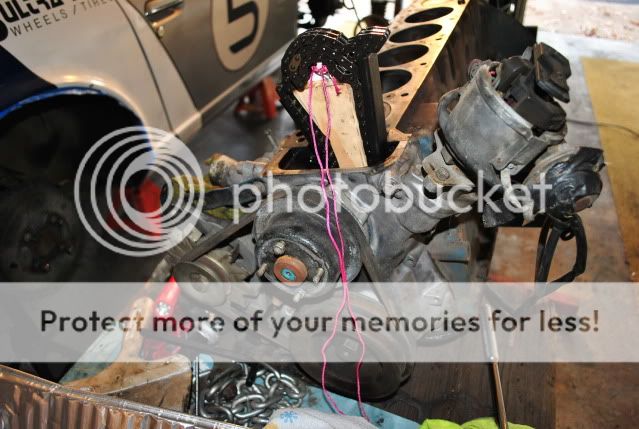 ^I made a timing block to prevent the timing chain from falling.         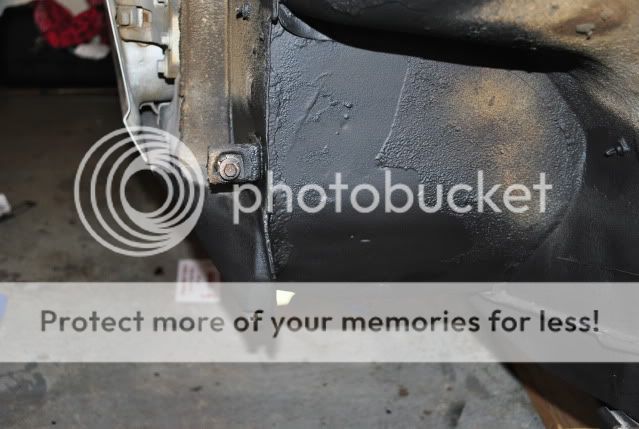   ^The 2 cans I used for the z. Both are great quality cans.          ^ Took care of that nasty rust spot! I grinded it down, and it looked like swiss cheese! At the moment I just coated the crap out of it and it looks much better. Down the line I will weld it up properly but for now it will be more than fine.    ^ Another angle. This is the rustest part of my z, and the one frame rail that was scrapped. (isnt rotting through the body just the bottom part) So that is taken care of the body is in amazing condition! I am very happy with that. 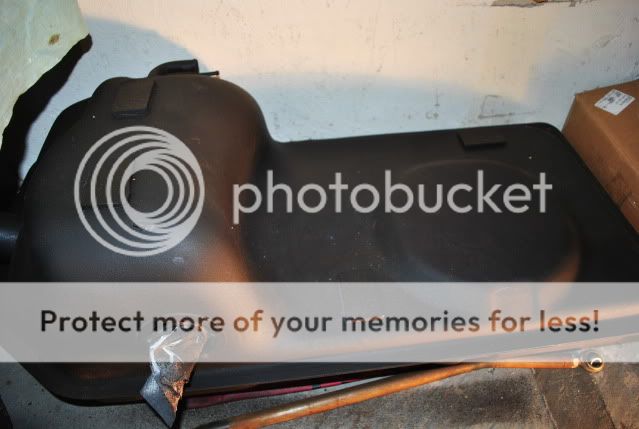  ^ Coated the gas tank as well and it looks awesome! Almost new! Working on the z found 2 surprise rust spots. One on the driver side door, which was odd but must have been banged up at one point. So I sanded it down to metal and took care of that. The second spot was on the passenger side where the pointy part of the fender sits by the windshield. Took care of that as well as they covered it up with some tape! :/ That was an easy fix and coated it as well. So basically now im going to focus on the interior clean it up, paint the roll cage red and clean up the floor pan with the rubberizes 3M. Going to ask around on what I should do with the block but im leaning toward the master rebuild kit for $600 and building the motor up with that.
__________________
Be sure to visit our page and join our group on Facebook! New Jersey Z Car Club: NJZCC 76' Datsun 280z Build Thread: To view links or images in signatures your post count must be 10 or greater. You currently have 0 signatures. |
|
|
|
|
12-25-2011, 01:11 PM
|
#14 |
|
Tri-State Aficionado
|
Update!
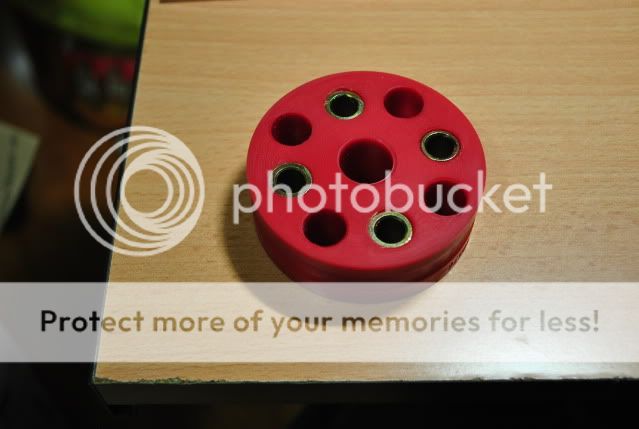
Well its been awhile, sent out my motor to be built by JDS Motoring in port reading, New Jersey. He is a really good friend of mine and he is doing the work for a great price, so I couldnt resist building up the motor to a respectable status. All I really wanted were 280zx flat tops the rest 280z parts, so 200hp should be within my expected output in the end. Brought a silver mine rear disk kit and some pieces for the front to complete it like ss lines and the spacers. Finished the driver side front and that was cake. Got to the passenger side and the disk needs to be surfaced as it has a high point -____-. The front is basically done, the rear isnt going to be hard but its a a pain with the parking brake lol.  ^ Driver side, looks soo pretty. 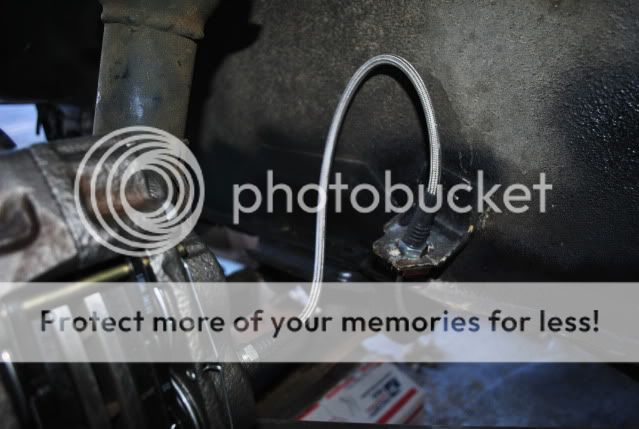 ^ SS line is serious business! 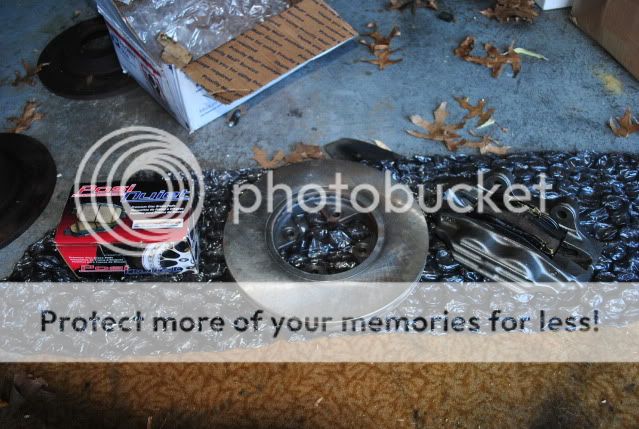 ^ Passenger side, with the disk that needs to be cut a bit to even it out. 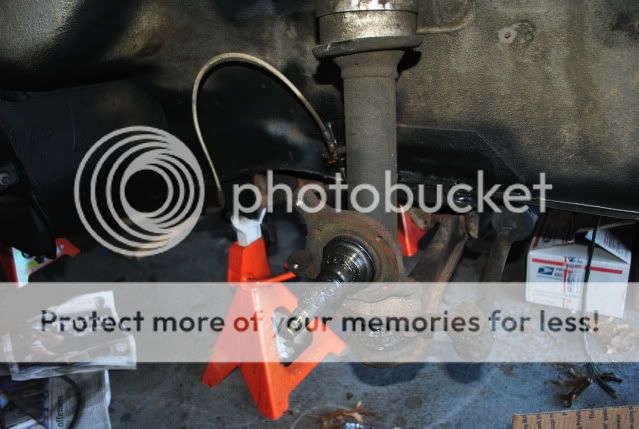 ^ Passenger side, it already had ss lines but they were weak sauce for the new set up. 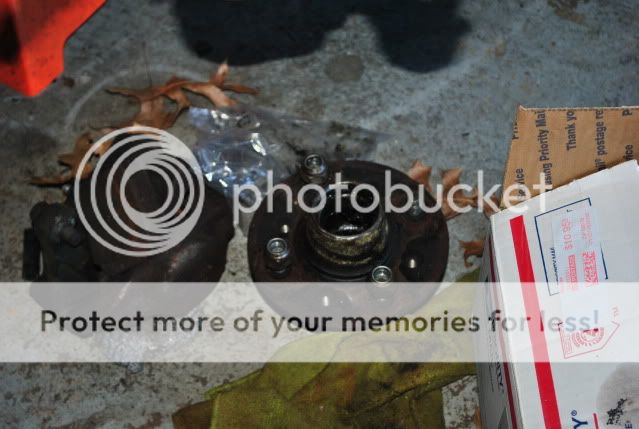 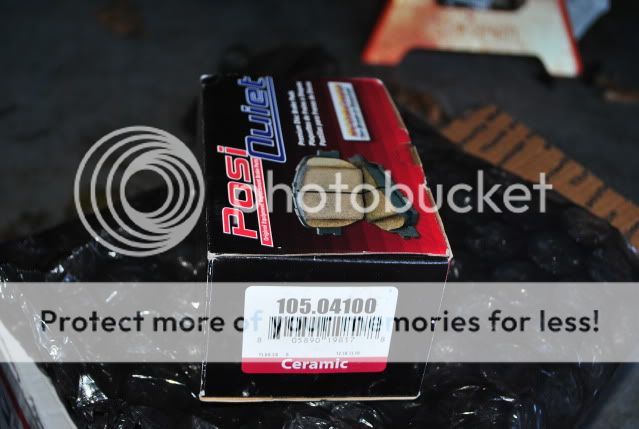  ^ The old icky front brakes. Gotta say they are pretty nice, but they dont compare to the 4x4 calipers and z31 vented disks.  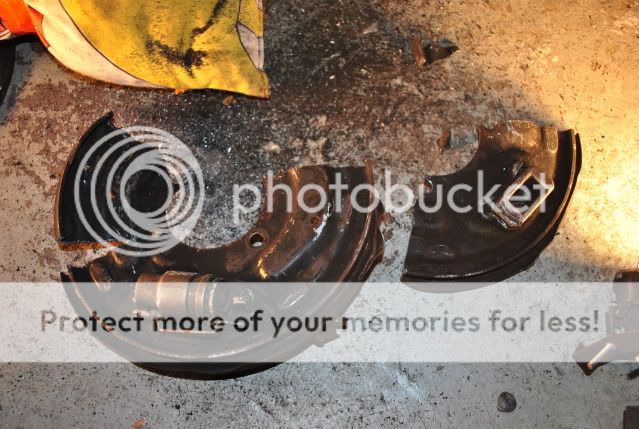 ^ The devils work lol. This sucker has to be cut in order to fit the rear disks. It wasnt that bad. 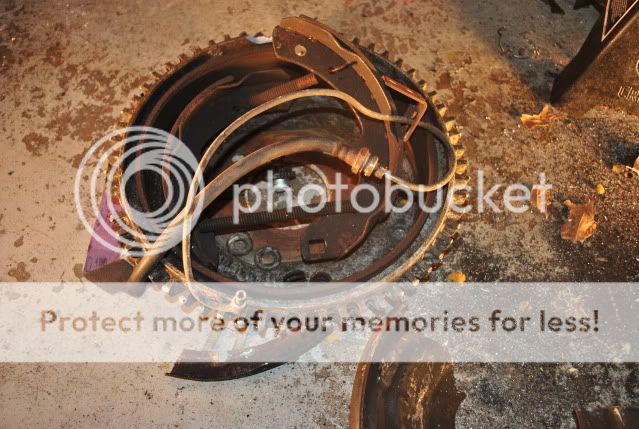 ^ All the nonsense of the driver side rear. Those drum covers put up a SERIOUS ass battle! I hammered the driver side so hard it split in half! The passenger side came off like butter. 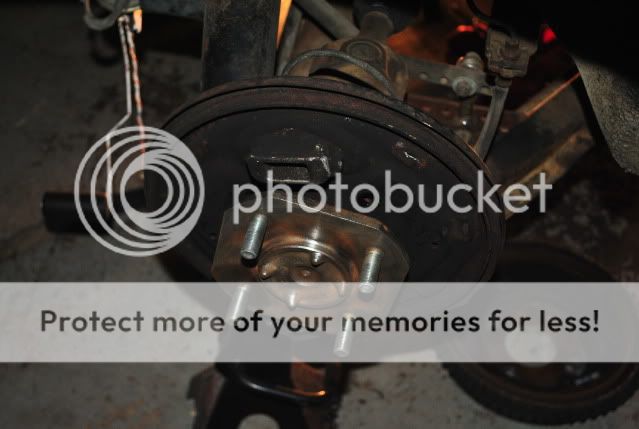 ^ Passenger side hub, with the back plate still on it. Hammer it a few times to loosen it off the hub and then cut away with a sawzal VERY CAREFULLY. 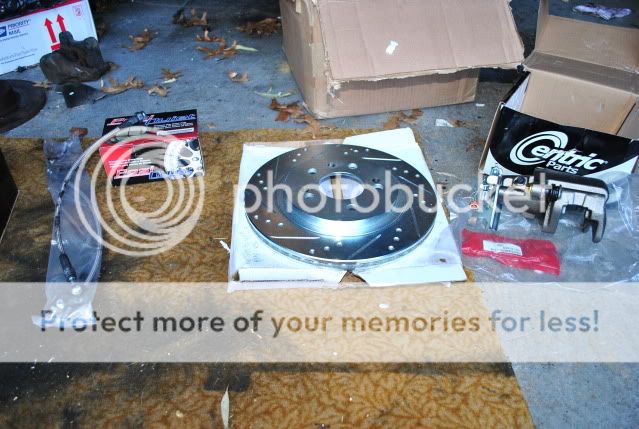 ^ The rear goodies! This kit is serious. Its expensive but worth it! Edan is a very good guy. (messed up my order though :/ I wanted NO drilled/slotted disks just regular. But its all good, I dont intend to track the z yet. 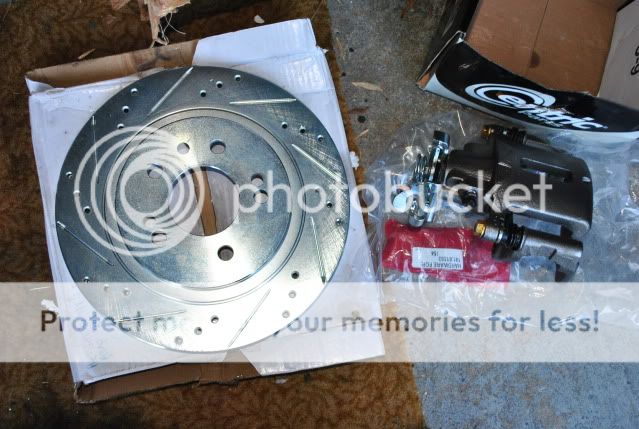 ^ Calipers come off a ford cobra I think, the year is 2010? 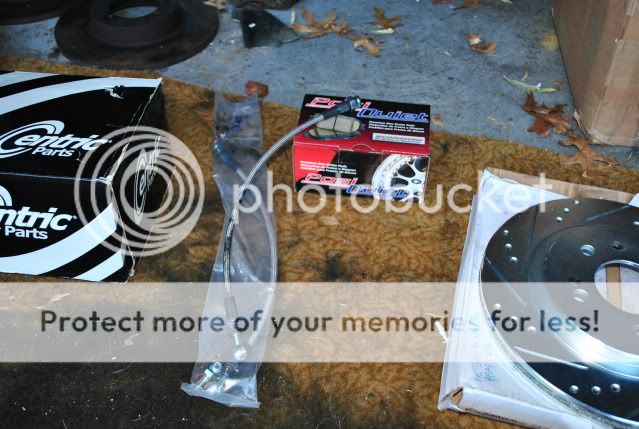 ^ss brake lines, my rubber ones were shot! Painted my cage, its REALLY hard with it still in the car. So hard I have drips galore lol. I dont care though, as long as it doesnt rust again. Im going to sand it and give it another coat and then clean up everything else. Since part of the interior is now red lol. Some area's of the cage are ON the body of the car, I cant even get a thin piece of paper between the body and the cage. This was a nice cage but man did they do a tight job. 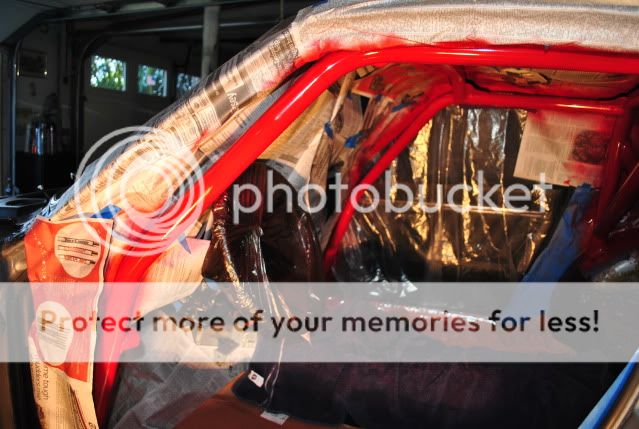 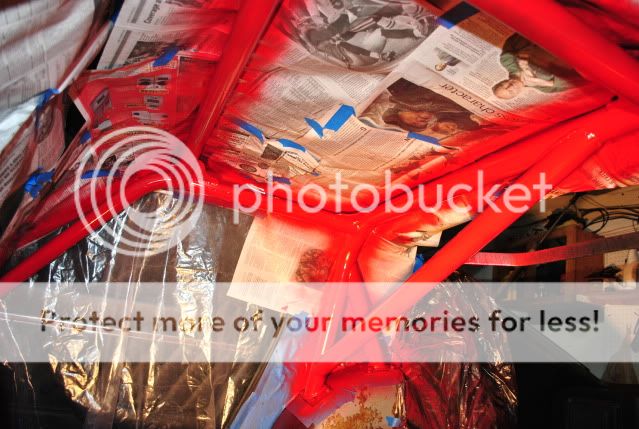 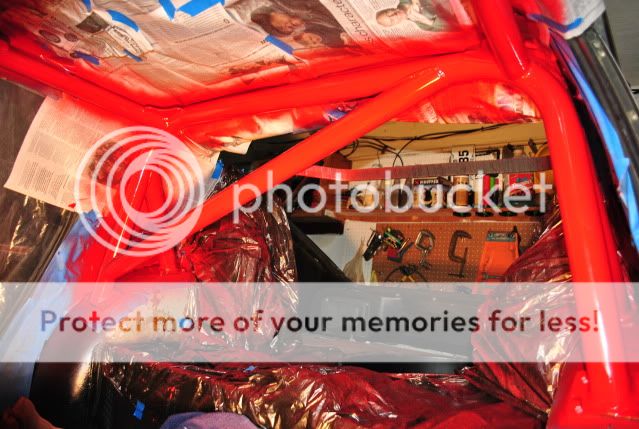 These guys are still waiting to be united with their best bud mr.L28 T___T. Hopefully I get the motor in January, as by then I'll have the brakes all done, and the gas tank back up. All I need is a hose for the gas tank and a master cylinder from a 79-81 280zx. I can get one but its almost impossible to get another or even a rebuild kit! This is how she sits now, waiting... 
__________________
Be sure to visit our page and join our group on Facebook! New Jersey Z Car Club: NJZCC 76' Datsun 280z Build Thread: To view links or images in signatures your post count must be 10 or greater. You currently have 0 signatures. |
|
|
|
|
01-13-2012, 11:55 AM
|
#15 |
|
Tri-State Aficionado
|
Well I jut noticed I didnt update about my brakes so here is the whole write up I did.
This is a write up I made, I was given permission by edan to post this. Silver Mine Motors Rear Conversion Kit This kit includes everything you will need to install into your z. Some situations might need some modification that will be on, YOU, the owner. Edan is the owner of Silver Mine Motors, which produces fabulous products for the s30 chassis as well as other models. He mostly sells brake products but also sells some suspension components. His products are cheapest and he does his best to keep it that way. If you happen to find a brake kit cheaper, send him the link and he will match it! Edan has amazing customer service and responds to his emails/calls quickly. Check out his website to order your kit! http://www.silverminemotors.com/main.sc  Facts about this kit: -You should really upgrade to a 15/16 master cylinder OR the more available 1inch master cylinder. This is important if you already upgraded your front brakes. You should also consider a proportioning valve. -My 15inch panasport wheels (15x6) WILL NOT FIT. The minimum is a 15inch wheel HOWEVER it will depend on the WIDTH and OFFSET of the wheel. In consideration is also the design of the wheel. Some spoke design might be to concave, and hit against the caliper. Too much of an inward design will hit the caliper, be sure to test fit the wheels. -First things first, I have a 76 280z so other years might differ slightly. Tools you will need: 19mm: wrench. 17mm: wrench. 14mm: wrench. 10mm: wrench. Sawzall: cut backing plate. Screw driver. Cotter pins: Have a couple. They don’t need to be large, medium or smaller ones work fine. Rubber mallet or 5lb mallet: Optional to beat out your drums. PB Blaster: This is your friend use this A LOT. Needle nose plier. Getting started: 1-First off, more than likely your drums are stuck onto your car. So use the mallet to beat the drum off the stub axel. If it breaks off (the drum) it is ok, the parts are not going to be used any more. 2-Once the drum is off, you will be looking at the brake shoes and springs, as well as the cylinder holding the parking brake cable. 3-Behind the backing plate are the hard lines for the parking brake. These are no longer needed and must be removed. The only line needed is the hardline from the main braking system. Be careful removing the parking brake hard lines, and then remove the parking brake cable, save the bolt that holds it in place. Push the cable aside, as it will be needed later on. 4-With the screw driver or needle nose, remove the springs carefully of the brake shoes and it will come off. 5-Once the brake shoes are off you will be able to see 4 bolts that are holding the backing plate in place. Remove those carefully. They are not in the best position, so they will be prone to stripping if you aren’t careful. 6-Once the backing plate is loose it is now ready to cut. If it isn’t loose, hit it a few times with the mallet until it is loose. 7-Once loosed, CAREFULLY use the sawzall to cut the backing plate in two sections. It is best to cut in a “V” shape on both sides and bend the plate repeatedly to snap off. If done carefully, you should hit nothing and it should come off fairly easily. Again be CAREFUL not to hit the stub axel or the parking brake cable, or even your brake line hose. 8-After the backing plate is removed, you should have all the pieces of the old braking system in a pile and ready for the new kit to go in. 9-The kit is very easy to install, I recommend ordering the stainless steel brake lines. 10-The mounting bracket should have the “silver mine” logo facing toward the differential and should be mounted opposite of your strut assembly. Use the 3 bolts with lock washers and bolt it in place with the 17mm wrench. 11-With the bracket in place, put the rotor on and use the lug nuts to hold it in place. 12-Put the caliper in place with the pads in it already and use the 2 bolts to bolt in the caliper, 19mm wrench. If you have the stainless steel line, screw that into the caliper before you bolt it in the bracket. Then screw it into the hardline. 13-Now the parking cable is ready to be installed. The cable is held on a bracket to avoid rubbing against the driveshaft. If necessary, remove the bracket to obtain proper length and install the parking brake cable, using the previous bolt to hold it in with a cotter pin. -With all that done, you are ready to drive! Go to an open area with no traffic to test it out. Special thanks to Edan at Silver Mine Motors for providing a great kit and pictures. Also a special thanks to David Palermo for providing great pictures. Pictures now:                     My Silvermine motors rear calipers: Mustang 05-10 calipers. DO AT EVERY BRAKE PAD CHANGE. Here it is: http://www.stangmafia.com/forum/f59/...ake-pads-6541/ Here is how I replaced the rear brake pads on my 2007 GT500. Here is a list of tools and supplies used for the install: 1. 3/8" drive ratchet handle with extensions as needed 2. Metric Sockets: 13mm standard 3. Torque Wrench - 3/8" drive 4. Brake caliper tool Notes: Prior to starting I had washed the wheels to reduce the dust and wore a particle mask to avoid breathing in the dust (nasty stuff). I also released the parking brake prior to starting. Remove the two guide pin bolts with a 13mm socket. Then remove and secure the caliper with a short bungee cord. See the fifth picture below for a suggested anchor point. I understand you don't need to remove the lower bolt to replace the pads; perhaps just loosen enough to allow the caliper to swing out. This way the caliper is more stable when resetting the piston. But I removed both bolts when I replaced my pads.  Here is the caliper tool I used to reset the piston; got it at Harbor Freight for about $20. I used the #5 adapter plate, whose pins fit the keyed notches on the piston surface.   You have to turn the piston in a clockwise direction while applying forward pressure with the tool. The backing plate on the tool pushes against the opposite side of the caliper while turning the handle. It can take substantial force to turn the pistons; wearing mechanics gloves while turning the handle helps. My hands are still aching. Here's what the piston looks like when compressed back into the caliper.  The piston must be oriented so the key slots are as shown here to fit into an alignment pin on the back of the inboard brake pad (the pin is circled on the outboard pad below).   Remove the old brake pads and spring clips.  Assemble in reverse with new pads and spring clips then replace the caliper and snug down the guide pin bolts. See notes below on the application of caliper grease.  There is a flat spot on the opening of the guide pins that must be aligned with a flat edge on the caliper mounting flange as shown here.  Torque down the guide pin bolts to 24 lb-ft in the following order: * RH caliper - tighten top bolt and then the bottom bolt * LH caliper - tighten bottom bolt and then the top bolt Here's what the rear brake looks like all assembled.  I didn't apply any caliper grease at the time, but I intend to go back and apply some synthetic caliper grease to the areas of the pads (back surface only) that come into contact with the caliper and piston. Caution: After servicing the brakes, be sure to pump the brakes as many times as needed to make sure they are firm and effective before putting the car into gear. Some added facts, The panasports now fit. They were 15x7 0+ offset and I got a 30mm spacer with studs and it clears. I could have gotten a 20mm but I wanted to be safe. She pokes like hell but I will be going zg flares eventually. For now just a roll so that the car car at least run, once the motor is back.
__________________
Be sure to visit our page and join our group on Facebook! New Jersey Z Car Club: NJZCC 76' Datsun 280z Build Thread: To view links or images in signatures your post count must be 10 or greater. You currently have 0 signatures. |
|
|
|
|
01-13-2012, 12:19 PM
|
#16 |
|
Tri-State Aficionado
 |
This is a sweet Z, who did your coilover install? I no longer have a garage to work out of nor do i have my own equipment anymore.
|
|
|
|
|
01-13-2012, 12:55 PM
|
#17 | |
|
Tri-State Post Whore
|
defiantly will keep my eye on this one.
__________________
04 nSRT4 - To view links or images in signatures your post count must be 10 or greater. You currently have 0 signatures. Quote:
|
|
|
|
|
|
01-13-2012, 02:27 PM
|
#19 |
|
Tri-State Aficionado
|
Thanks guys! Yea still waiting on the motor, everything else thats big is either purchased or ready to be installed once the motor is in. I know more little stuff will come up as im going along. My biggest fear is the brakes and having to fine tune them to the way like it. Im sure no one would like the feeling of not braking.
The car used to be an ITS car in the 80's and all the work done when I got it was done by them. Then the car sat for probably 15 years and I have it now. The coilovers are awesome they sit nice and low but I have no clue what they did, that was all them. They even have a sweet camber kit! My guess im going to look for some s13 coils or something but I know a guy (george down by south ish jersey) that can weld coilovers. I asked him and he was going to do it to his z to sit nice and low.
__________________
Be sure to visit our page and join our group on Facebook! New Jersey Z Car Club: NJZCC 76' Datsun 280z Build Thread: To view links or images in signatures your post count must be 10 or greater. You currently have 0 signatures. |
|
|
|
|
01-13-2012, 03:14 PM
|
#20 |
|
Tri-State Post Whore
|
Very interesting project that I'll also be interested to follow. Congrats and good luck.
Talk about "waiting on the motor" my next door neighbor is doing the RB thing to his now: 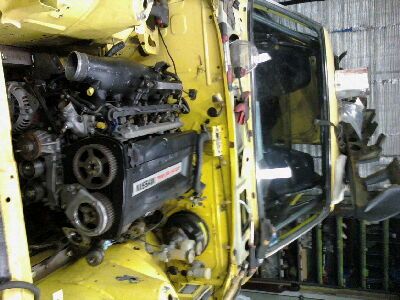
__________________
Nick '95 6sp Supra Twin GT2860's w/TiAL exhaust housings, 2X TiAL WG's and BOV's, on V-band moded HKS twin manifolds, AEM v2, FJO w/NTK, AEM meth/water spray, GSC S1 cams, OS Giken triple clutch and Super Lock LSD, Racelogic |
|
|
|
 |
| Bookmarks |
|
|
 Similar Threads
|
||||
| Thread | Thread Starter | Forum | Replies | Last Post |
| Yellow 280z @ rowan | Foolinaround | Spotted! | 0 | 10-28-2009 08:22 PM |
| 280z on bristol rd feasterville | jspek | Spotted! | 0 | 07-18-2009 03:31 PM |
| 240/260/280z thread | StreetEG | Gallery | 13 | 03-28-2008 10:07 AM |
| Check out this 280Z | mazda6guy | Gallery | 11 | 02-18-2005 12:40 AM |


 Linear Mode

