 |
|
 05-29-2013, 02:05 PM
|
#161 |
|
Tri-State Post Whore
|
__________________
96 Mazda Protege DX 5MT 92HP, 96 ft-lb torque, 2378 lbs. - SOLD! 2005-2012 00 Porsche 986 5MT Est. 230HP, 205 ft-lb torque, 2777 lbs. - DD/Track Car. SOLD! 2010-2014 12 Mazda2 5MT. 100HP of Fury. 2300 lbs. DD/Autox 2015 - Current 13 MK6 GTI 2020 - Current |

|

|
|
06-02-2013, 11:37 PM
|
#162 |
|
Tri-State Addict
Join Date: Dec 2007
Location: Port Fishington, Philly
Member #6568
My Ride: 95 Bonnie, 98 i30, 07 Ducati Monster S2R 800 iTrader: (0)
|
^^ yeah I can see it.
Nothing too exciting but I got the pedal plate and pedal bolted in for good. I used Hv-350 sealant between it and the firewall and around the wiring grommet. I still have to fill in between the wiring and the grommet but that'll come when everything else is in place. Before:   After:   So, the dash is ready to go back in. One thing I never checked was the tie rod length between the 00+ and the 92-99. When I was eying the toe the 00+ tie rod ends, I seemed to be running out of thread quicker than I would with the 92-99. I think I chucked the old ones and never checked till now. Sure enough, the 00s are shorter. I had a feeling, so I ordered 2 new moog tie rods for 92-99. The 92-99 is on the left.  Otherwise, the axles are being worked on and might be done in the next couple weeks. The front header is on it's way back from jet hot. And some bar stock is in the mail to finish up the rear trans dog bone mount bracket. Last edited by 95naSTA; 06-05-2013 at 02:20 PM. |
|
|
|
|
06-04-2013, 11:03 PM
|
#164 |
|
Tri-State Post Whore
|
i've been reading this thread from the beginning and the amount of work you invested in this car is amazing. this is one of the few build threads where I look for daily updates..lol. keep up the great work bro.
__________________
I own quick cars but never go WOT Race me and I'll be the hottest thing you'll ever see in your rearview mirror |
|
|
|
|
06-04-2013, 11:30 PM
|
#165 | ||
|
Tri-State Post Whore
Join Date: Apr 2011
Location: Maryland
Member #20326
My Ride: 06 STi/08 Legacy/10 Forester iTrader: (5)
|
Agreed^ the updates arent as often but outdo almost all others, this is one build that I am super impressed with. The amount of work and time put into this is incredible.
__________________
To view links or images in signatures your post count must be 10 or greater. You currently have 0 signatures. To view links or images in signatures your post count must be 10 or greater. You currently have 0 signatures. Quote:
Quote:
|
||
|
|
|
|
06-09-2013, 11:04 PM
|
#167 |
|
Tri-State Addict
Join Date: Dec 2007
Location: Port Fishington, Philly
Member #6568
My Ride: 95 Bonnie, 98 i30, 07 Ducati Monster S2R 800 iTrader: (0)
|
I was able to get the dash back in today.. I was glad I took a bunch of pics when the dash came out in September.. That took all the guess work out of which screw/bolt goes where, the order, and any connections. I need another radio which is why that's missing and water leaks need to be addressed before the carpet goes back in. I'm also going to worry about the center console shifter area after the car is up and running.
  The unibody rails I drafted came in. I'm happy I went this route. It'll look a lot nicer than bar stock. 
|
|
|
|
|
06-16-2013, 10:14 PM
|
#168 |
|
Tri-State Addict
Join Date: Dec 2007
Location: Port Fishington, Philly
Member #6568
My Ride: 95 Bonnie, 98 i30, 07 Ducati Monster S2R 800 iTrader: (0)
|
Did a bit more cutting and mocking of the new unibody rails.
   Still a little more cutting to do but this is how the new water jetted pieces will sit. I know how I'm going to weld the inner piece and closing it all up with sheet metal shouldn't be too bad. |
|
|
|
|
06-19-2013, 12:10 AM
|
#169 |
|
Tri-State Addict
Join Date: Dec 2007
Location: Port Fishington, Philly
Member #6568
My Ride: 95 Bonnie, 98 i30, 07 Ducati Monster S2R 800 iTrader: (0)
|
Axles came in.
 They match up good with the original measurement I took relative to a stock G6 axle. These are actually Cobalt SS inners, G6 outers, and custom length 300m centers. I still have to get them a test fitted but so far so good. |
|
|
|
|
06-30-2013, 11:44 PM
|
#170 |
|
Tri-State Addict
Join Date: Dec 2007
Location: Port Fishington, Philly
Member #6568
My Ride: 95 Bonnie, 98 i30, 07 Ducati Monster S2R 800 iTrader: (0)
|
I tacked together the rear trans dogbone tie in to the lower oil pan. It's a bit different from the angle iron stuff I've been doing.
I'll be redoing some of the welding.. I pulled something in my neck and it was screaming at me the whole time.     This will take the moment arm off the jack shaft mount and add the rigidity I was looking for. The oil filter needs to be relocated and I wanted to wait till the jack shaft mount and axles were complete to try and figure out what to do with it. A few posts back I found out that the old Reatta oil filter housing interfered with the p/s pump. The H-body housing hits the axle (see the one on top) but the W-body style (one bolted on in pics) looks like it'll work with a relocation adapter bolted to the filter location. Other people have used the W-body oil filter housing like this with 3.8/F40 swap but I had to verify it. It'll have to be ground down a little to clear the CV band clamp too.      
|
|
|
|
|
07-12-2013, 03:41 PM
|
#171 |
|
Tri-State Addict
Join Date: Dec 2007
Location: Port Fishington, Philly
Member #6568
My Ride: 95 Bonnie, 98 i30, 07 Ducati Monster S2R 800 iTrader: (0)
|
Anddd. The mounts are done.
The passenger rear dogbone mount is all welded up. I also clearanced the rear drivers side mount from the p/s rack mounting on the subframe so I have full right to left adjustability.. if I need it. When I grinded it down, I made sure I broke through, welded it back up, then ground it down again.      Off to Bonehead.. |
|
|
|
|
07-27-2013, 03:52 PM
|
#172 |
|
Tri-State Addict
Join Date: Dec 2007
Location: Port Fishington, Philly
Member #6568
My Ride: 95 Bonnie, 98 i30, 07 Ducati Monster S2R 800 iTrader: (0)
|
Literally right as I was about to start the unibody work, I got a phone call from Bonehead Performance saying my parts were ready.. lol. I picked those up yesterday and got a big chunk of the unibody work in. Both rails are fully welded in. Most of the work was in the prep.. and all the copper coloring is the weld through primer. I put this on before and as much as I can after to coat the exposed metal. Next step is boxing it all in with sheet metal.
     ^^ I didn't get a good pic of it but where the rail goes through the top of the unibody in the back, I had holes drilled so I could weld through the rail onto the unibody between the rail and the strut tower. I also cut a slit in the rail so I could weld through it inside the unibody by the strut tower. 
|
|
|
|
|
10-06-2013, 03:52 PM
|
#173 |
|
Tri-State Addict
Join Date: Dec 2007
Location: Port Fishington, Philly
Member #6568
My Ride: 95 Bonnie, 98 i30, 07 Ducati Monster S2R 800 iTrader: (0)
|
I've been busy the past few weeks..
I finished boxing in the unibody work with 1/4" steel and added another rail in the wheel well area. The bottom of the vertical sheet metal that I left was curved inward and closest to the trans when mocking things up. I opted to cut that out and add that wheel well rail right above it. This gave plenty of clearance when installing the trans. I underbodied in the void where the trans sits and I primed and rattle canned the top. I'll revisit the top with some more smoothing and real paint later.              Clearancing the oil Jegs universal oil adapter and stock filter housing for the axle.    For the custom length clutch line, I called up Rogue Engineering in NJ. They sell a DOT approved SS braided line for BMWs that have the same quick connect fitting on one end. The G6 has this fitting on both sides.. I was thinking I may have to run 2 of their lines with a double male adapter connecting the 2. I asked them if they can make a custom length line and they said 'We can do anything you want'. I LOVE hearing that.. 2 days later I had a custom line in my hand for $85 plus shipping. The only thing I was a little weary about was the size of the O-rings vs. larger stock G6, so I just swapped those over.  Spec clutch kit for a S2 3800 and F40:  The Hydraulic Throw Out Bearing spacer in the kit came on another HTOB that isn't the same as the G6. So, I just swapped the spacer on the one that came on my trans. The point of the spacer is to keep the HTOB from over extending when pressing into the pressure plate. The stock dual mass G6 setup has a higher stack height. G6 on left     Clutch installed:  Bracket for the relocated oil housing and re worked -10AN oil cooler routing:  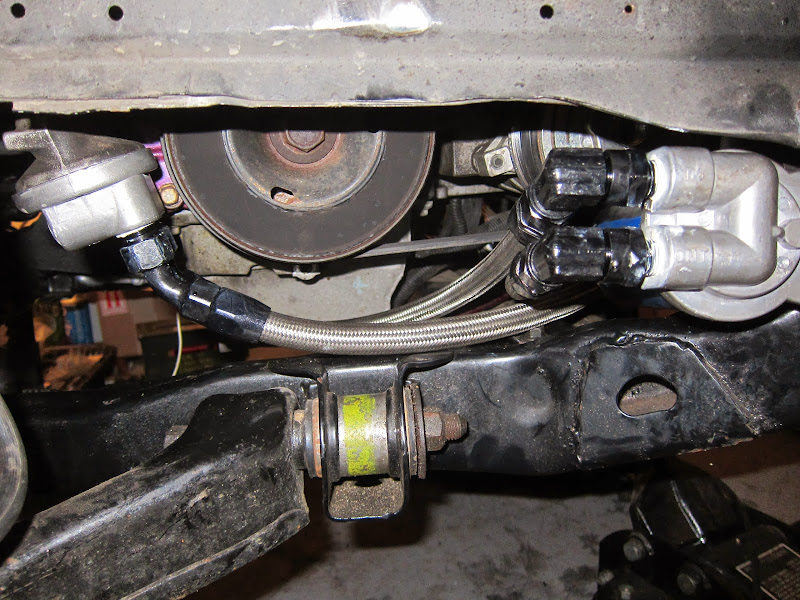  Bracket holds oil housing on the left. G6 brake pedal:  More or less together:      The electrical side of things was made easier by Ryan at Sinister Performance and Micky Moose on Fiero.nl: http://www.gmtuners.com/fiero/transbypass.htm http://www.fiero.nl/forum/Archives/A...-2-116755.html And when I figured out that the Malibu hubs are 5-6mm shallower than 00+ H body:  ^^ that kinda sucked and required a 5mm spacer behind the brake rotor to space it correctly in the caliper bracket. I drove it around the block last night and back and fourth down my street.. damn that felt good. My front alignment is way off and my tune needs some work but it runs and drives good. http://www.youtube.com/watch?v=3IBlsPoaJbw Last edited by 95naSTA; 10-06-2013 at 03:55 PM. |
|
|
|
|
10-27-2013, 11:14 PM
|
#175 |
|
Tri-State Addict
Join Date: Dec 2007
Location: Port Fishington, Philly
Member #6568
My Ride: 95 Bonnie, 98 i30, 07 Ducati Monster S2R 800 iTrader: (0)
|
^^ Thanks!
Kinda bad news.. The trans has to come back out. The hydraulic throw out bearing is leaking.. The HTOB spacer SPEC includes with the kit might not be thick enough to keep it from over extending. Background info - The G6 has a thicker dual mass flywheel. This means the HTOB had less distance to travel stock to hit the pressure plate. The spacer should have solved that problem but it looks like it didn't. Not really a huge deal in the grand scheme of things. Especially since I can drive to my buddy's shop and work on a lift there. For now though, I'm going to drive it, dial in the tune, and work on a few misc. things. I was able to get over to my buddy's shop last week to get on a lift and the alignment rack. On the lift I installed real 5mm wheel spacers behind the rotors to space them correctly, did an oil change, clearanced a p/s line from the header, tied up the aft O2s, and bled the p/s a bit more. On the alignment rack I added a little more camber than I had before up front and got the toe in check. I'm about -1.6* camber all around. When they're not slammed with jobs they let me have free reign over their alignment rack. So I can go back and tweak whenever.  Yesterday I got the dual widebands hooked back up (1 front bank, 1 both banks) and today I installed and unlocked a factory CD player with a new display bulb from corvette radios. An aux input is on the to-do list.. I like the radio to match so it's staying for a while. I've been trying to get the speedometer dialed in but haven't had much luck. The PPM function in my software doesn't change the cluster output. I played with the instrument panel divisor setting to get it lower at least but after I adjust past a certain point, the speed gets worse. I'm probably going to hit up Ryan at Sinister Performance for guidance on that. (tons of experience with these pcms) The car also wanted to stall out a lot when coming to a stop. I played with the IAC follower and commanded airflow per gear but ultimately fixed the problem by adjusting the idle set screw. Here's the car going through the first few gears (cluster speed is 1.7 times real speed): http://youtu.be/zPfwJ1ZJyLQ |
|
|
|
|
11-03-2013, 09:41 PM
|
#176 | |
|
Tri-State Addict
Join Date: Dec 2007
Location: Port Fishington, Philly
Member #6568
My Ride: 95 Bonnie, 98 i30, 07 Ducati Monster S2R 800 iTrader: (0)
|
I emailed Ryan at Sinister after my last post and I got a detailed response 9 hours later. (can't say enough about that guy)
Paraphrasing he said: The 97-99 3800 pcms calculate the speed differently from the 94-95s. In my pcm there’s a VSS calculation for the pcm and a separate instrument panel calculation which is manipulated by a divisor. The PPM value I can change does calibrate the speed for the internal pcm calculations but none of the options for the IP divisor will generate the needed 4k ppm output needed. The stock trans has a 30 tooth reluctor with 24k ppm. The F40 has a 72 tooth reluctor with 60k ppm. The stock ppm is divided by 6 to get a 4k output but there's nothing to divide the F40 ppm by to get 4k. Quote:
While waiting for the SGI-5 I fried the power cable from the alt to the fuse box.. at the fuse box. The wire cover melted and the copper turned black.. My alternator also had a humming noise coming from it.. So, I made a new alt to fuse box wire, cleaned up the the fuse box contacts and cleaned up all my grounds. All while re-dielectric greasing everything. A strange problem I also had with the previous alt was I couldn't get it to charge without adding a 99+ H-body +12v ref sense wire. (common pre-99 3800 crowd mod) I installed a new alt without the sense wire and got it to charge fine. So that's good news. The SGI-5 came in so I got that installed. I took the Bonnie grocery shopping today.. lol.. but speedometer wasn't working.. Luckily it comes with diagnostic blinking lights to narrow down the problem. Wrong output type. I had it hooked up as 4k square wave out but it needed to be 4k AC. Simple fix. When verifying via GPS, the speedo seems spot on up to 50. I`ll verify further when I take it back on the highway. I routed the wiring into the glove box through a hole the PO had for a kill switch.  
Last edited by 95naSTA; 11-03-2013 at 09:50 PM. |
|
|
|
|
|
11-03-2013, 11:38 PM
|
#177 |
|
Tri-State Post Whore
Join Date: Apr 2010
Location: Philadelphia/Cheltenham
Member #16318
My Ride: 1993 Lexus ES300 "ES 5Spd" iTrader: (0)
|
Well i just read through all 9 pages of this and i wanna say i'm impressed with what you've done so far. keep up the good work.
__________________
93 Lexus ES300 I/E UR FSB UR 19mm RSB 92 Lexus SC300 Stock Grocery Getter Crew (GGC) To view links or images in signatures your post count must be 10 or greater. You currently have 0 signatures. |
|
|
|
|
12-29-2013, 10:52 PM
|
#178 |
|
Tri-State Addict
Join Date: Dec 2007
Location: Port Fishington, Philly
Member #6568
My Ride: 95 Bonnie, 98 i30, 07 Ducati Monster S2R 800 iTrader: (0)
|
Thanks^^
The weather has been crappy and the HTOB finally bled down enough for it to have trouble getting into gear. This hasn’t given much incentive to take the car out. And I've got a couple other things going on I'm trying to sort out before I rip the trans back out.. So, I decided to restore both headlight lenses and remount the projectors and highs. The clear on the outside was pealing and the mounts for the projectors and high beams were broke.. It's been something I've been putting off for a while.. I used a headlight restoration without tools method on the lenses. Before:   Took them down to 400 grit:  After 500, 600, 800, 1000, 1200 dry and 1500 and 2000 wet. Top is pre 50/50 urethane and mineral spirits and bottom after.  Stock, the E39 headlights are mounted and adjusted from the rear of the headlight assembly. Both the projector and high beam lens are mounted together on one metal bracket and adjusted simultaneously. The assembly didn't fit so I had to figure out a way to mount the projector and high to the rear of the headlight lens. There were hollow shafts sticking out of the back of the lens around each of the two light holes. Four on the projector side and 3 on the high side. Originally, I epoxied threaded shafts into these holes and mounted the stock metal bracket on these. Over time the threaded shafts got loose and oxidized.. There were some clearancing issues since resolved that also contributed.. The assembly was never sealed either. The back was opened to the elements and dirt often made it's way in there. Stock:    This time around I used slightly larger threaded shafts, tapped the holes and installed them with epoxy. They're also secured with a nut at the base. I separated the high and projector and made individual mounting brackets for each. The projectors are adjustable against 8lb springs and all hardware is stainless. I never use the high beams so I didn't make those adjustable. The highs are at least sealed against the lens except for the rear top hole. The projector shroud still needs to be sealed against the back of the lens.            
|
|
|
|
|
12-31-2013, 12:05 PM
|
#179 |
|
Tri-State Post Whore
|
EPIC!
Now this is craftsmanship and a build!
__________________
To view links or images in signatures your post count must be 10 or greater. You currently have 0 signatures. sure! To view links or images in signatures your post count must be 10 or greater. You currently have 0 signatures. |
|
|
|
|
01-19-2014, 05:53 PM
|
#180 |
|
Tri-State Addict
Join Date: Dec 2007
Location: Port Fishington, Philly
Member #6568
My Ride: 95 Bonnie, 98 i30, 07 Ducati Monster S2R 800 iTrader: (0)
|
Thanks! ^^
The headlights are finally finished. I picked up the BMW style corner bulbs and sockets to replace the stock Bonneville ones that I had been just jamming into the headlight. They didn't clear the rear mount I made I chopped them down, soldered them in through the bottom, and filled the plugs with potting epoxy to seal them.   For sealing the projectors, I searched for a while and eventually came across roof flashing seals. I picked up the right size, cut them up accordingly, and it seals well.  
|
|
|
|
 |
| Bookmarks |
|
|
 Similar Threads
|
||||
| Thread | Thread Starter | Forum | Replies | Last Post |
| Shudder in OD - 96 Bonnie | Honest_Bob | GM Talk | 7 | 05-04-2011 05:59 AM |
| what should we do with Bonnie sweeten? | jdmwill | Off-Topic | 9 | 05-31-2009 05:04 PM |


 Linear Mode

